
Septic Tank Design and Construction
Design and Construction details for a Septic Tank
A septic tank design needs to be well designed and built so that it won't crack and won't pollute the ground water.
Here we look at the design and construction of a septic tank and we provide building plans for a standard sized tank.
We discuss the features, the need to determine effluent levels and the tank inlet and outlet pipes, the transfer pipe between the internal chambers, vent pipes and the design of access manholes so the tank can be maintained and cleaned out.
See also:
- Bacterial Action In A Septic tank
- Septic Tank size-how big?
- Septic system care
- Blocked Toilets and Drains
Septic Tank Design
Before we start you might want to remind yourself of how a septic tanks works by looking at the article from the the previous article at www.mrfixitbali.com/septic-sewage-and-wastewater/bacterial-action-in-a-septic-tank-199.html.

A Septic tank needs to be strong enough
A well built septic tank will not leak and should be able to withstand earth movements, unfortunately many septic tanks in Indonesia are cracked and leaking.
It is easy to underestimate the forces that a septic tank has to withstand. You will see people building septic tanks using lightweight concrete blocks (batako) with a thin skim of cement on the inside. The slightest bit of ground movement, probably even the settlement resulting from the tank's construction, will be enough to crack it.
We should also bear in mind that when a tank is operating it will be holding a metric ton (1,000 kgs) of liquid for each cubic metre, for an average tank this is likely to be as much as 3 or 4 tons. That is a lot of weight.
Septic tanks should be either made from plastics that will give a little with ground movement or be built from reinforced concrete and designed such that in the event of ground movement the tank will move as a single entity and retain its integrity.
In addition how well your septic tank will work is dependant on how well it is designed and built. There are many people around building septic tanks who do not fully understand how they work. I am often asked about the subject so this week we will get technical I'm afraid, we'll look at a well designed septic tank and explain its design features.
How big a septic tank?
The first thing we need to know is how big the tank should be. There are several ways of working this out but if you go to the charts at www.mrfixitbali.com/septic-sewage-and-wastewater/septic-tank-size-121.html this will allow you to decide the size you will need.
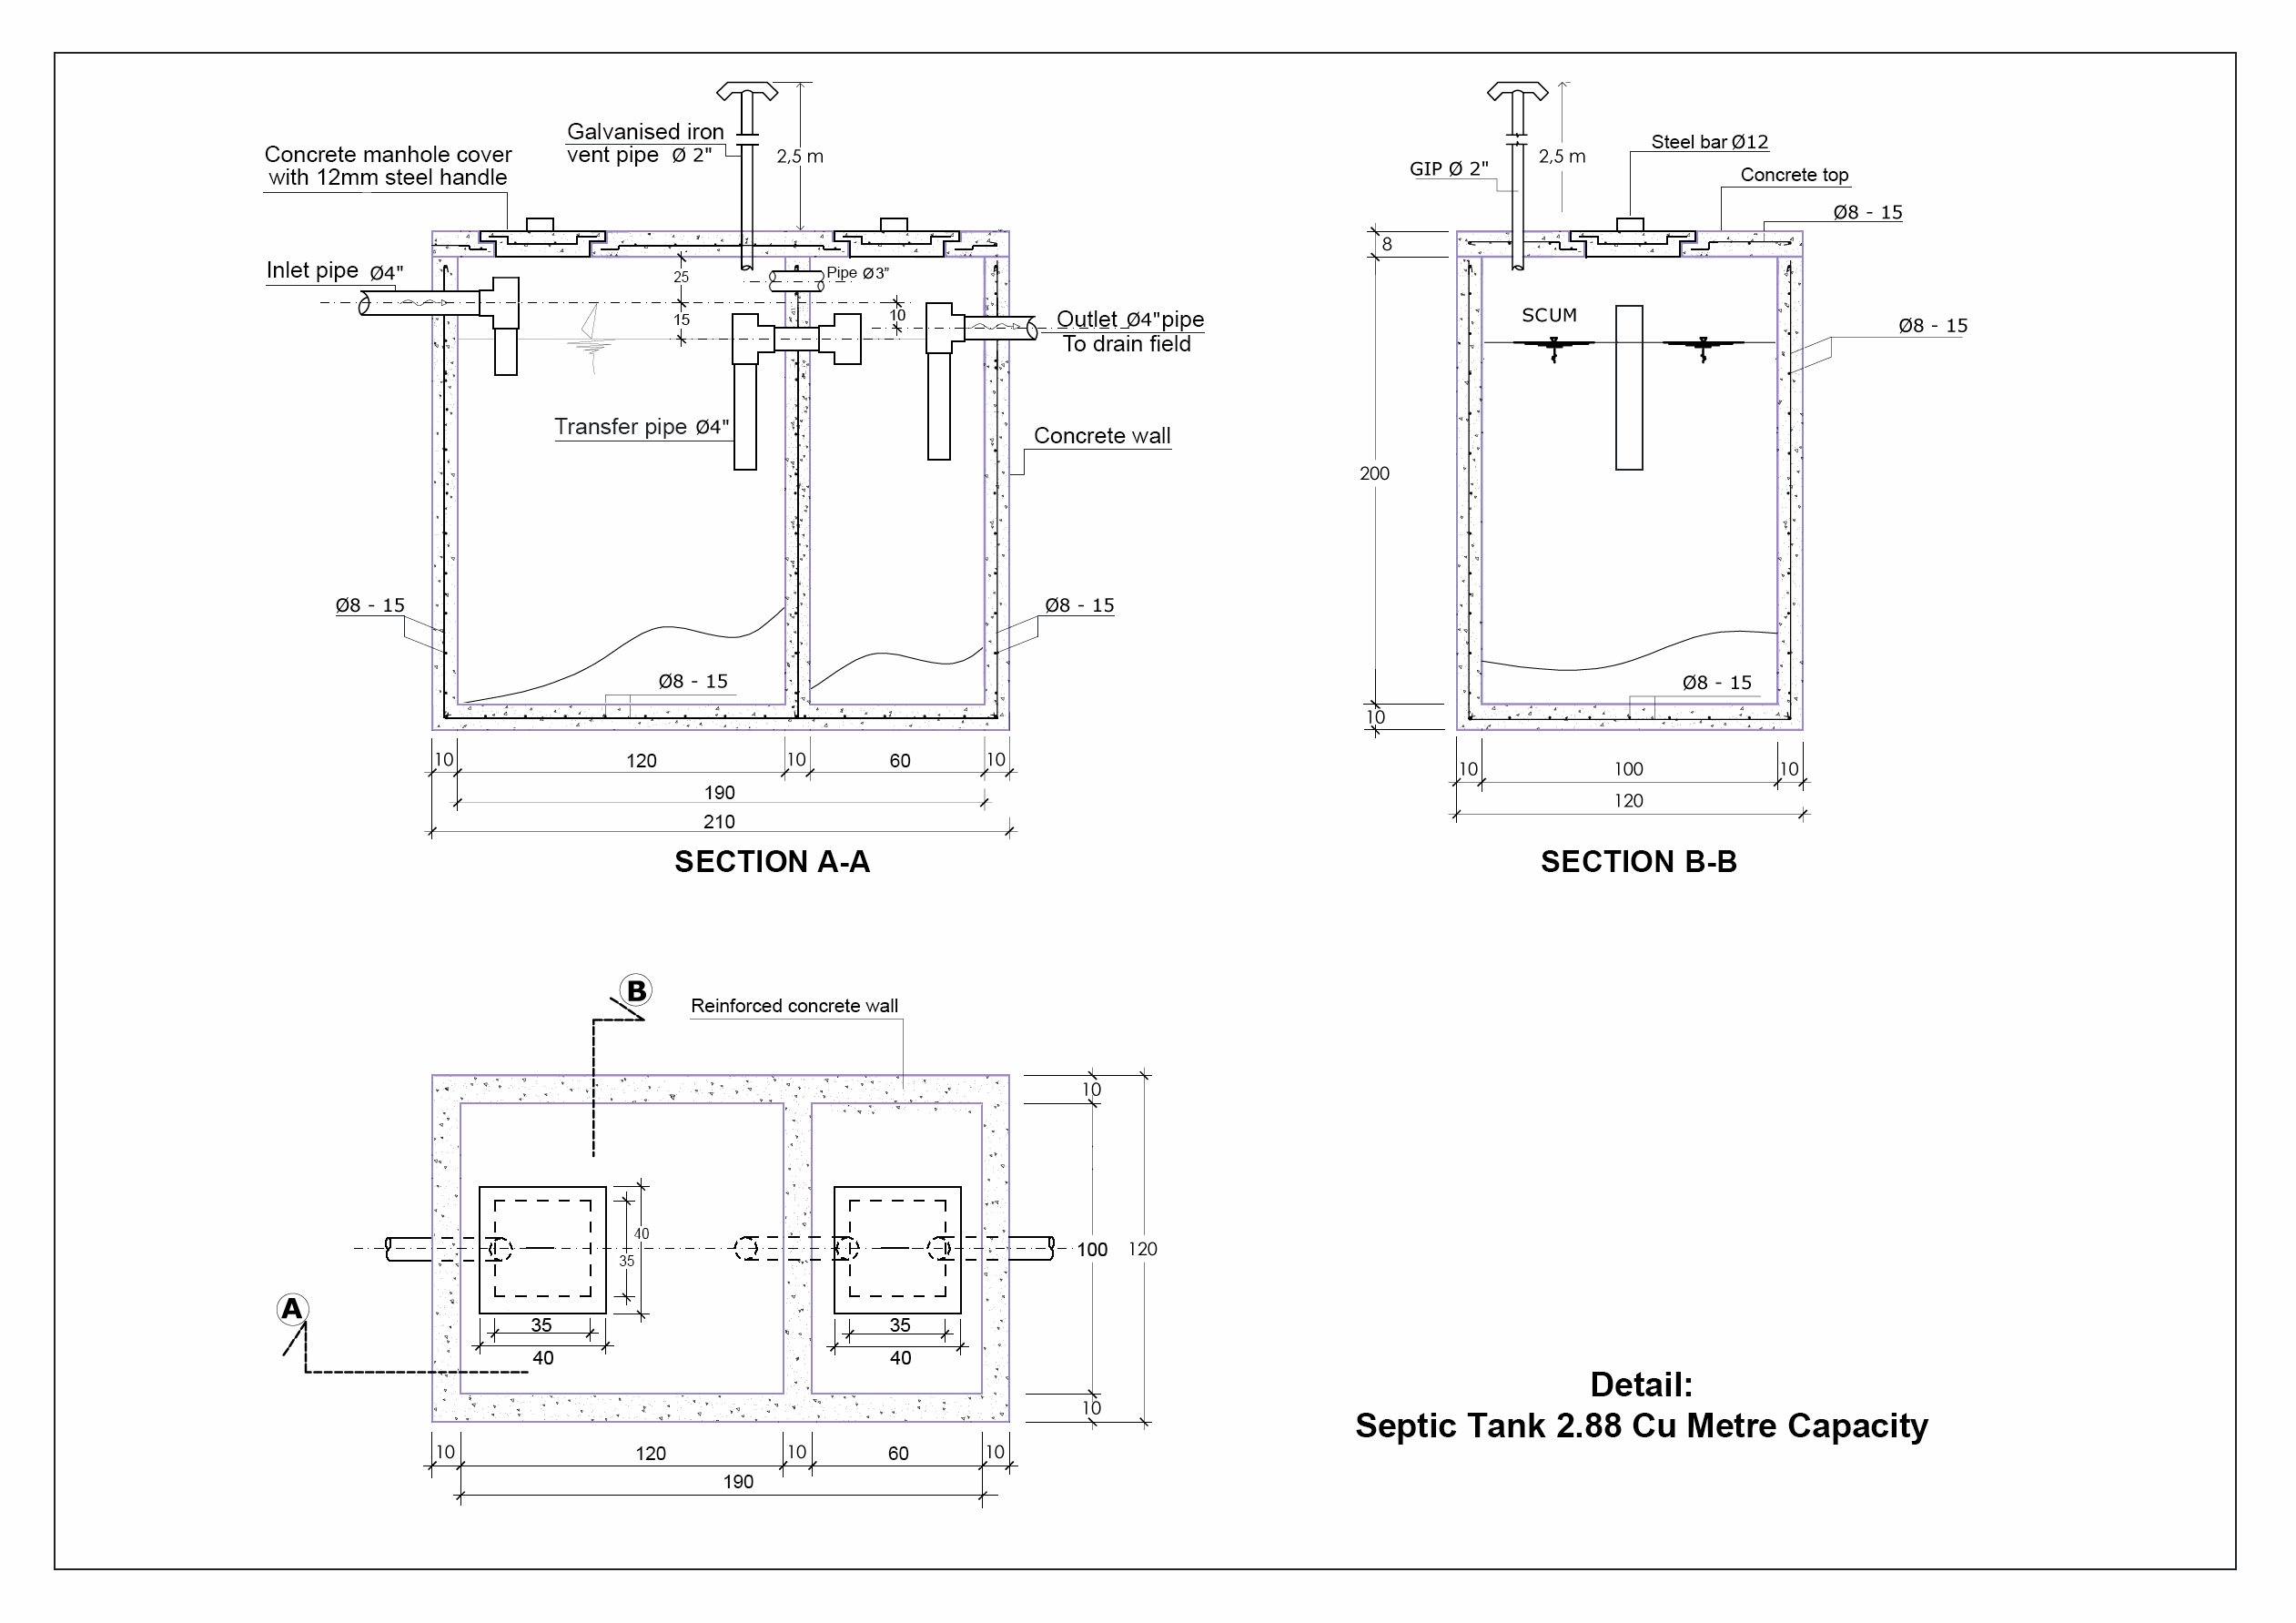
Let us say we need a tank of 2.9 cubic metres (the amount of effluent the tank will hold) this is typical for an average 2 bathroom house with 4 people living in it. Refer to the construction drawing below for a 2.88 cu m septic tank designed for a typical household. To download the complete septic tank detail drawing you can go to www.mrfixitbali.com/septic-tank/septic-tank-3-cm.gif
How many chambers?
A septic tank should have at least two chambers, 3 is better but 2 is enough. The second chamber can be around half the size of the first chamber.
In this tank the first chamber is 1.2m x 1.0m x 1.6m deep = 1.92 cubic metres liquid capacity. The second chamber is 0.6m x 1.0m x 1.6m deep = 0.96 cu m capacity = a total capacity of 2.88 cubic metres. Note that 1.6 metres is the depth of the effluent in the tank.
This tank is purposely designed to be quite deep while having a smaller footprint for use on smaller blocks of land.
 Click on the image to download the full drawing
The walls and floor of the tank are 10 cms (4 inches) thick reinforced concrete providing sufficient strength to withstand water pressure and a reasonable amount of earth movement. The reinforcing steel is a mesh of 8 mm diameter reinforcing bars spaced 15 cms (6 inches) apart and built into a mesh box.
Septic Tank Construction
When casting the concrete shuttering (plywood formwork) is placed around the steel to form a box shaped mould ready to cast the concrete around the steel. This should be placed to make sure that the walls are 4 inches thick and, when the concrete is poured, that there will be a good thick layer of concrete on both sides of the steel mesh to stop the steel rusting.
There should also be a bed of sand underneath the concrete floor of the tank to allow some movement as the tank settles and moves in the ground.
The 15cm (4 inch) diameter PVC inlet, transfer and outlet pipes for the tank need to be installed before the concrete is poured along with a 7.5cm (3 inch) diameter ventilation pipe to allow gas to flow between the 2 chambers.
The concrete should be correctly mixed (the mix should be designed to suit the sand and other materials being used however if this is not possible then 3 parts aggregate : 2 parts good quality sand : 1 part of cement is good). Too much water should NOT be added (a slump of 7 is good) to give a good hard concrete and, during pouring, the concrete should be vibrated with a vibrator to make sure it is properly compacted with no cavities or air holes. The aggregate must be small enough to fit easily between the steel and the plywood.
This might all sound complicated, in fact it is not difficult and following these straightforward guidelines will make sure you have a well built tank that will not leak or crack.
So we now have a concrete box with 2 chambers.
Levels are very important
It is important when designing the septic tank that you pay close attention to levels. The inlet pipe to the tank that carries effluent from your toilet to the tank need to be 15 cms diameter and a slope of at least 2% (a fall of 2cms per meter) all the way from the toilet to the tank.
The tank must be built deep enough to allow for this and should be carefully planned before you start.
The inlet pipe should go straight into the septic tank. Many contractors want to install small manholes (locally called control boxes) to access the inlet pipe just before it enters the tank. These manholes are a common cause of blockages and smells. It is better to have a free flow straight to the tank.
Inlet, Outlet and Transfer pipes
We now install the pipework. Note the positions of the inlet, outlet and transfer pipes inside the tank, the inlet pipe is higher than the outlet pipe and the transfer pipe is a bit lower than both. These relative heights are important.
This tank design has 15cm (4 inch) tee pieces on both the inlet and outlet pipes and on both ends of the transfer pipe between the chambers, these keep the pipes clear of the scum that forms on the surface of the effluent as it is digested by the bacteria. They also help to reduce any turbulence that might be caused as effluent runs into the tank and from one tank to the other. We want as gentle a flow as possible through the tank.
The transfer and outlet pipes have vertical extensions on the tee pieces in the upstream chamber. This is so that liquid entering the pipe is taken from the central level of the tank below any turbulence and high enough to not get blocked by deposits at the bottom of the tank.
Finally an open 7.5cm (3 inch) diameter pipe is installed between the 2 chambers above the water and scum level to relieve any pressure buildup and allow free flow of gases between the 2 chambers.
Manholes and Vent Pipe
We can now install the top of the tank, once again a 15cm (4inch) thick reinforced concrete slab is used. The top has a 2 inch diameter galvanised steel vent pipe in it. In this design the pipe is over 2 metres high to allow any gases to be freely dispersed in the wind. Remember that when operating properly a septic tank should not smell.
The top also has 2 manholes in it. Normally these will be sealed with grout to make them gas tight. The manholes are large enough to allow someone to enter the tank should maintenance be needed and are positioned so that they allow access to the inlet and outlet pipes to clear blockages.
The manholes also allow access to pump out the tank, a process you may have to carry out say once every five years. Many tanks are built without manhole covers but have 15cm (4 inch) diameter pipes in the top to allow the tank to be pumped out. In these cases it is not possible to get into the tank to repair or unblock it should the need arise.
Note that the manhole covers are designed to seal with horizontal surfaces. You will find in some places that contractors may make the manhole and their covers fit together with a tapered joint. It is very difficult to make tapered joints that fit properly and so they are difficult to seal. Flat surfaces are much better. Also make sure the manhole covers have steel handles so they can be lifted.
See also:
- Bacterial Action In A Septic tank
- Septic Tank size-how big?
- Septic system care
- Blocked Toilets and Drains
Phil Wilson
Copyright © Phil Wilson October 2014
This article, or any part of it, cannot be copied or reproduced without permission from the copyright owner.